Why Colorado's Temperature Swings Cause Unique Roof Damage
Denver's mile-high elevation means intense solar radiation during the day and rapid heat loss at night. A January afternoon might hit 55°F while the same night drops to 10°F. That 45-degree swing creates a destructive pattern: snow and ice melt during the day, water seeps into every available gap, then refreezes overnight with enough force to widen cracks and lift sealant bonds.
Water expands roughly 9% when it freezes. In a hairline crack along a shingle tab or around a pipe boot, that expansion exerts thousands of pounds of pressure per square inch. The crack widens. The next day, more water enters the now-larger gap, freezes again, and pushes even harder.
Over a single winter, this cycle repeats 60 to 80 times along the Front Range.
Altitude amplifies the problem. At 5,280 feet, UV radiation is about 25% stronger than at sea level, which degrades asphalt shingle oils and makes the material brittle. Brittle shingles crack more easily under freeze-thaw stress. Add expansive bentonite clay soil that shifts foundations during wet-dry cycles, and you get rooflines that move just enough to break flashing seals and valley joints.
New entry points for meltwater appear every spring.
The Daily Cycle: How Ice Expands and Retreats
Most freeze-thaw damage happens on south- and west-facing slopes where afternoon sun melts accumulated snow. Water runs downslope, pools in low spots, and seeps under shingle edges or into fastener holes. When temperatures drop after sunset, that water turns to ice and pries upward on anything above it.
Flashing around chimneys and skylights is especially vulnerable. The metal-to-shingle seal relies on flexible mastic or caulk that turns rigid in cold weather. When ice forms behind the flashing and pushes outward, the brittle sealant cracks rather than flexes. By morning the ice melts, but the seal stays broken, ready to admit more water the next day.
This isn't a problem you can solve by shoveling snow off your roof. The damage happens at the micro level, in places you can't see without pulling up shingles or inspecting from the attic during active melt periods.
Many homeowners assume a roof either leaks or it doesn't. But freeze-thaw creates a middle state: slow infiltration that wets insulation and rots decking before you ever see a drip inside.
Where Freeze-Thaw Hits Hardest on Your Roof
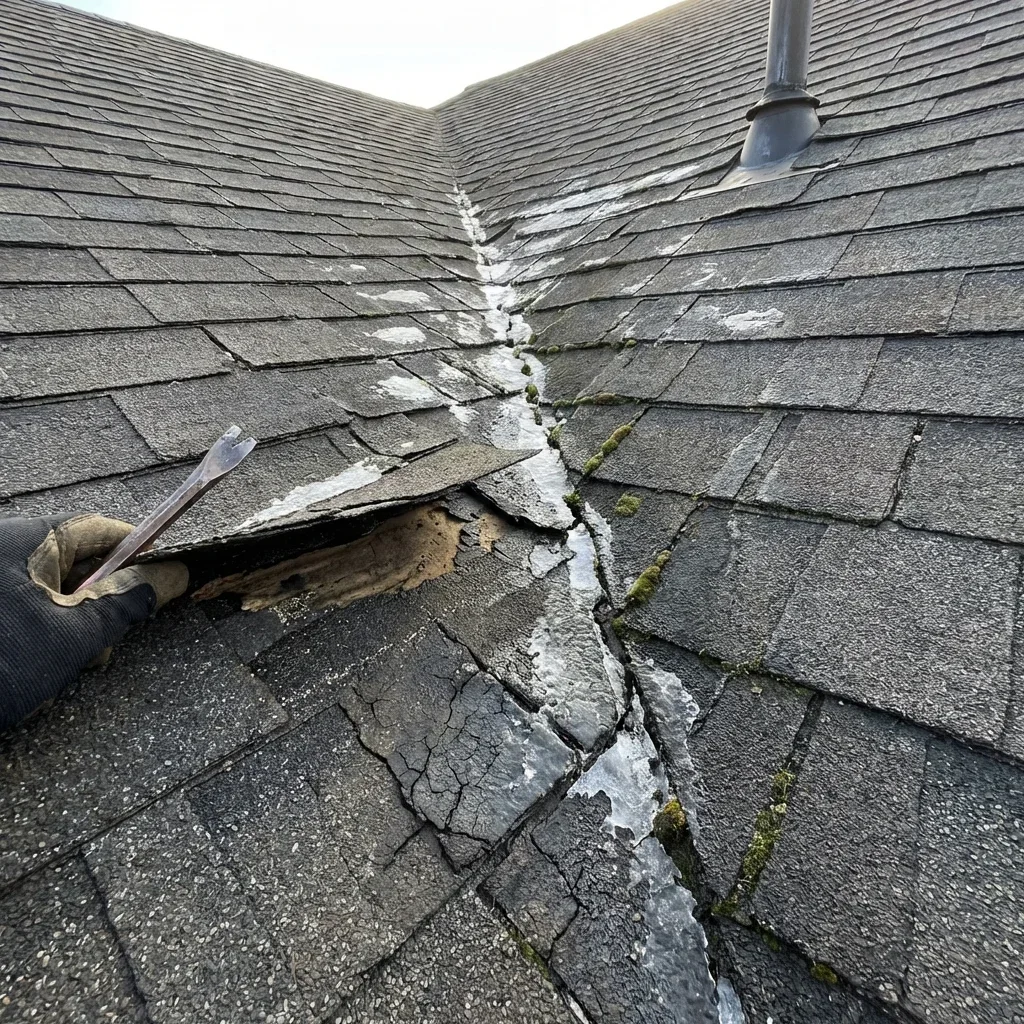
Valleys concentrate water flow, which makes them the #1 failure point in Colorado freeze-thaw conditions. Open valleys (metal-lined channels between roof planes) handle the stress better than closed-cut or woven shingle valleys, but even metal valleys can develop pinhole leaks where ice repeatedly lifts the edges. Closed valleys trap water between overlapping shingles. When that water freezes, it forces the shingles apart from below.
Pipe boots and vent flashings are the second most common failure points. The rubber or neoprene collar around a plumbing vent degrades from UV exposure (Denver gets 50% more UV than sea level) and becomes stiff within 8 to 12 years. Once stiff, it can't flex when ice forms underneath. Cracks appear around the base, water enters, and the decking around the pipe rots silently until the boot falls through.
Most Vulnerable Roof Areas (in Order of Failure Risk):
- Valleys — especially closed-cut or woven shingle valleys where water freezes between layers
- Pipe boots and vent flashings — rubber collars stiffen after 8-12 years of UV exposure
- Eaves and ice dam zones — unheated overhangs where meltwater refreezes
- Chimney and skylight perimeters — multiple corners create ice wedge points
- Step flashing along walls — freeze-thaw breaks overlapping metal-to-shingle bonds
Eaves and Ice Dam Zones
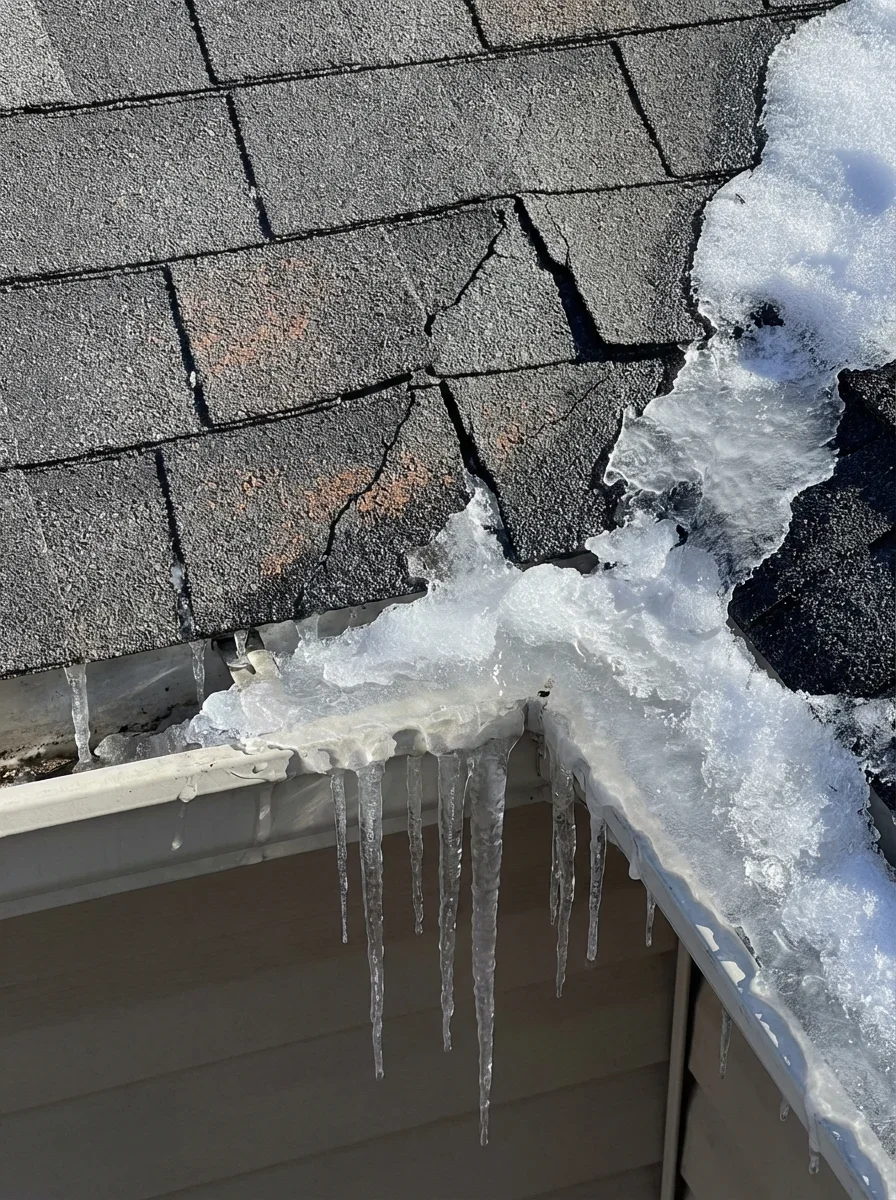
Ice dams form when heat escapes through your attic, melts snow on the upper roof, and that meltwater refreezes at the unheated eave overhang. The ice builds upward and traps subsequent meltwater behind it. That trapped water has nowhere to go but under the shingles, especially if your eave edge lacks a proper ice-and-water barrier membrane.
Colorado's 60°F daily swings make ice dams worse. The dam melts slightly during warm afternoons, releasing a surge of water that runs under shingles and refreezes overnight in new locations. You end up with multiple freeze zones along the same eave, each one lifting shingles a little higher.
Homeowners often see icicles and assume it's picturesque winter scenery. Those icicles mean water is running where it shouldn't be, and some of it is going under your shingles.
In mountain communities above 8,000 feet, snow load and freeze-thaw combine. Heavy snow insulates the roof surface, preventing daytime melt, but warm Chinook winds can raise temperatures 30 degrees in an hour. When that happens, massive melt surges overwhelm gutters and drainage paths, pooling water in every low spot where it refreezes that night with destructive force.
Shingle Damage You Can't See from the Ground
Granule loss accelerates under freeze-thaw stress. Ice crystals form on the shingle surface, bond to the granules, and pull them loose when the ice melts and slides off. You'll see granule accumulation in gutters each spring, but by the time granules are visibly missing from the shingle surface, you've lost a significant portion of the protective layer that shields asphalt from UV degradation.
Bare spots on shingles heat up faster in spring sunlight, which creates localized thermal expansion. The shingle curls at the edges, creating gaps where wind-driven rain and melt can enter.
Once curling starts, freeze-thaw cycles worsen it. Ice forms under the curled edge, lifts it further, and the curl becomes permanent. These curled edges are nearly impossible to re-seal without replacing the shingle.
Sealant Strip Failures
Asphalt shingles rely on a thermally activated sealant strip that bonds each shingle to the one below it. That bond requires sustained heat, usually a few warm summer days. In Colorado's climate, shingles installed in late fall or early spring may not seal properly before the first freeze-thaw cycle hits. When ice forms under an unsealed tab, it lifts the shingle before the bond ever forms.
Even properly sealed shingles lose adhesion over time. UV exposure degrades the asphalt oils that make the sealant sticky. After 12 to 15 years in Colorado's high-altitude sun, the bond weakens. Add freeze-thaw pressure from underneath, and tabs start lifting during winter wind events.
A lifted tab lets water underneath, where it freezes and prevents the tab from ever resealing.
Contractors installing asphalt shingle roofing in Colorado often hand-seal tabs with roofing mastic during late-season installs, but that's a labor-intensive step that not all crews take. If your roof was installed in October or November, checking for unsealed tabs the following spring can prevent years of slow water infiltration.
Flashing Failures: The Weakest Link in Freeze-Thaw Cycles
Step flashing along walls and dormers relies on overlapping metal pieces that interweave with shingles. Each piece of step flashing should sit under the shingle above it and over the shingle below it, creating a waterproof path down the roof-to-wall junction. When ice forms in that junction, it pushes outward on both the flashing and the shingles, breaking the overlap.
Counterflashing (the metal that covers step flashing and tucks into mortar joints on brick chimneys) often fails because the mortar joint itself deteriorates. Colorado's freeze-thaw cycles crack mortar, allowing the counterflashing to pull loose. Once loose, water runs behind the flashing, soaks the decking, and eventually rots the roof structure.
You won't see this damage until you're already dealing with interior leaks or visible sagging.
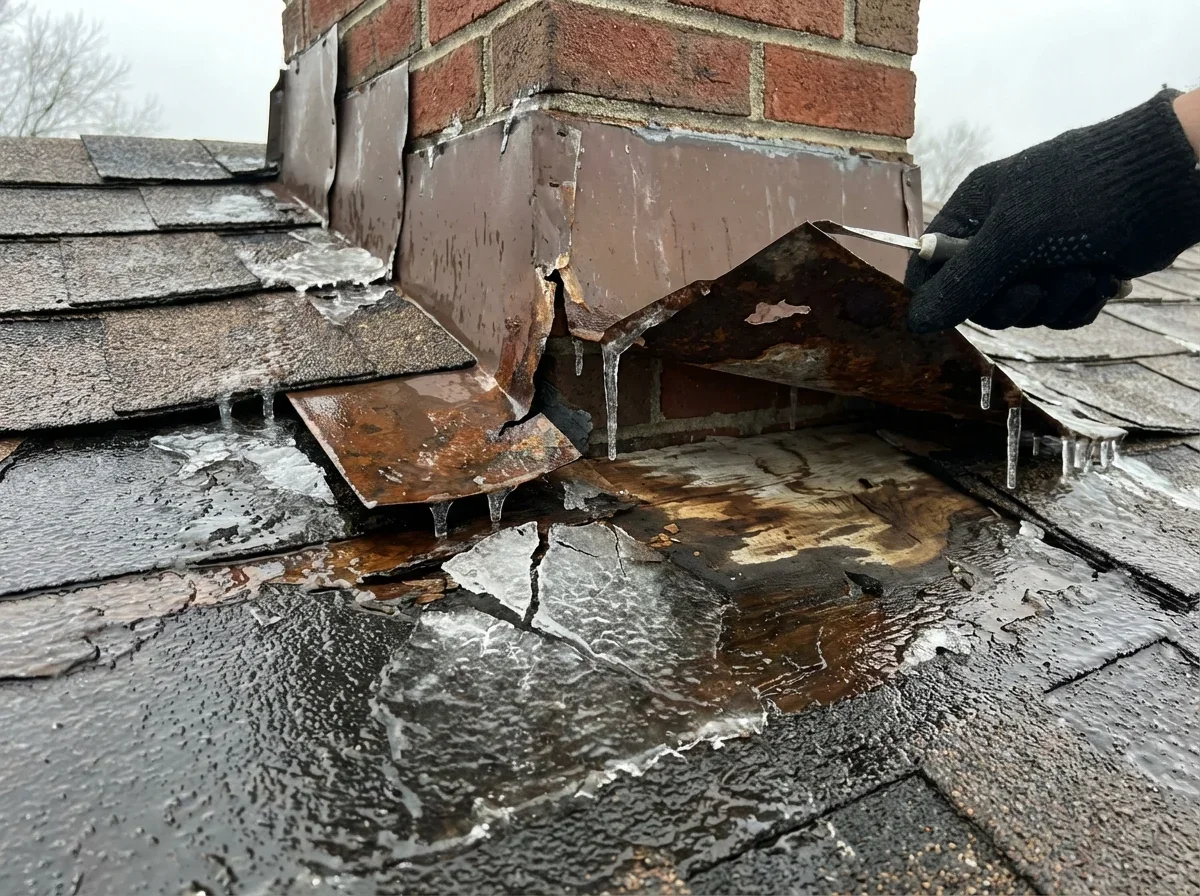
Skylight and Chimney Penetrations
Skylight installation creates a massive potential failure point in freeze-thaw conditions. The curb that raises the skylight above the roof surface has four corners, and each corner is a spot where ice can wedge under the flashing. Older skylights often used roofing tar or mastic as the primary seal, and those materials turn brittle in Colorado winters.
Modern skylights use engineered flashing kits, but even those depend on proper overlap sequencing. Install the pieces out of order and you've created a hidden water entry point.
Chimneys present a unique problem: they're a thermal mass. The chimney stays warmer than the surrounding roof because of residual heat from the flue, which means snow melts around the chimney even when the rest of the roof stays frozen. That meltwater runs down all four sides, pools against the flashing, and refreezes once the chimney cools. The ice pushes against the cricket (the peaked structure behind the chimney that diverts water), and over multiple freeze-thaw cycles, the cricket flashing separates from both the chimney and the roof deck.
How Expansive Clay Soil Compounds the Problem
The Front Range sits on bentonite clay, which swells when wet and shrinks when dry. A foundation shifting even a quarter-inch can torque the roofline enough to break valley seals and pull flashing away from penetrations.
Most homeowners don't connect foundation movement to roof leaks. In Colorado, they're often related.
When clay soil swells during spring snowmelt, it lifts one corner of the foundation. The roof framing flexes, valley metal buckles slightly, and the sealant between overlapping valley sections cracks. That crack is invisible from the ground, but it's big enough to admit water. Next winter, ice forms in the crack, widens it, and the leak worsens. By the time you see water stains on your ceiling, the valley may need complete replacement—not because the metal failed, but because the soil moved the structure.
This is why roof maintenance programs in Colorado should include annual inspections timed to spring melt and fall dry periods. An experienced contractor will check for valley alignment changes year over year and re-seal any gaps before freeze-thaw cycles can exploit them.
Class 4 Shingles and Freeze-Thaw Resistance
Class 4 impact-resistant shingles use a rubberized asphalt formulation that stays flexible in cold weather. That flexibility helps them withstand hail impacts, but it also reduces freeze-thaw damage because the material can flex slightly when ice forms underneath rather than cracking outright.
Insurance companies in Colorado offer 15% to 28% premium discounts for Class 4 shingles, which offsets the higher material cost over the life of the roof.
The catch: Class 4 shingles still depend on proper installation. If the contractor doesn't install an ice-and-water barrier at eaves and valleys, or if they skip hand-sealing tabs during late-season installs, you'll still get freeze-thaw failures. The shingle itself is more durable, but the system around it has to match that durability.
Metal roofing performs better in freeze-thaw conditions because it sheds snow and ice rather than trapping it. Standing-seam metal roofing has no granules to lose, no sealant strips to fail, and no overlapping tabs where ice can wedge. The seams are elevated and mechanically fastened, so water drains freely.
The trade-off is cost. Metal roofing in Colorado runs $12 to $18 per square foot installed versus $5 to $9 for Class 4 asphalt shingles.
| Roofing Material | Freeze-Thaw Performance | Typical Lifespan (Colorado) | Cost Per Sq Ft Installed |
|---|---|---|---|
| Standard Asphalt Shingles | Poor — granule loss, sealant failure, curling | 15-20 years | $4-$6 |
| Class 4 Impact-Resistant Shingles | Good — flexible formulation resists cracking | 20-25 years | $5-$9 |
| Standing-Seam Metal | Excellent — sheds ice, no overlapping seams | 40-60 years | $12-$18 |
| Slate | Excellent — non-porous stone unaffected by freeze-thaw | 75+ years | $18-$30 |
Synthetic Underlayment and Ice-and-Water Barriers
Traditional felt underlayment deteriorates quickly under freeze-thaw stress. Water soaks into the felt, freezes, and the paper tears when it expands. Synthetic underlayment (usually a woven polypropylene) doesn't absorb water, so it can't freeze-expand-tear. It costs about 40% more than felt, but in Colorado, it's worth the upgrade.
Ice-and-water barrier is a self-adhering rubberized membrane that seals around nail penetrations. Code requires it at eaves in Colorado (International Residential Code adopted statewide), but best practice extends it into valleys, around penetrations, and up rake edges.
When ice forms under shingles in these areas, the barrier's sticky underside prevents water from reaching the decking. It's the last line of defense when freeze-thaw breaks everything else.
Inspection Timing: When to Catch Freeze-Thaw Damage Early
Most homeowners schedule roof inspections after they spot a leak. By then, freeze-thaw damage has been accumulating for years.
The ideal inspection windows in Colorado are March (after the worst freeze-thaw cycles but before severe weather season) and September (after summer UV exposure and before winter prep).
A March inspection catches damage while it's still fresh. Look for lifted shingles, cracked sealant around flashing, and granule loss in gutters. If you catch a cracked pipe boot in March, you can replace it before summer storms drive water through the crack. Wait until November and you're repairing water-damaged decking, not just swapping a boot.
What Professional Inspectors Look For
Legitimate inspectors check attic spaces for water stains on the underside of decking, evidence of past leaks that may have dried out but indicate compromised areas. They look for nail pops (where freeze-thaw cycling has pushed nails up through shingles), flashing separations measured in millimeters, and valley alignment relative to the roofline.
These are not things a homeowner can assess from a ladder.
After major hail events, storm-chaser contractors flood Colorado offering free inspections. Many are legitimate, but some manufacture damage to generate insurance claims. A local contractor with municipal registration will document freeze-thaw damage accurately without exaggerating. You can verify contractor credentials through each municipality—Denver requires registration at denvergov.org, Colorado Springs at coloradosprings.gov, and so on. The state of Colorado does not issue roofing licenses, so local verification matters. You can check for complaints at colorado.gov/dora.
Repair vs Replace: When Freeze-Thaw Damage Crosses the Line
Individual shingle replacements work if the damage is localized—a few lifted tabs, one cracked valley section, a failed pipe boot. But when freeze-thaw damage appears across multiple roof planes or involves widespread granule loss, you're looking at systemic material failure.
Patching one area doesn't stop the cycle from continuing elsewhere.
A common scenario: homeowner repairs a leaking valley in year one, a pipe boot in year two, and lifted shingles in year three. Each repair costs $400 to $800. By year four, the cumulative cost exceeds what a roof replacement would have cost in year one, and the remaining original shingles are still degrading. This is where understanding when to repair vs replace saves money long-term.
Insurance Considerations for Freeze-Thaw Damage
Homeowner insurance in Colorado typically covers sudden, accidental damage (like a tree limb through the roof) but excludes gradual deterioration from wear and tear. Freeze-thaw damage falls into a gray area. If a specific winter storm event caused a sudden failure (documented by dates and photos), insurers may cover it. If the damage accumulated over multiple seasons, they'll deny the claim as maintenance neglect.
This is why insurance claim assistance from a local contractor who understands Colorado-specific freeze-thaw patterns can make the difference between a paid claim and a denial. They'll document the damage progression, tie it to specific weather events, and present it in terms adjusters recognize.
Trying to file a freeze-thaw claim yourself often results in a quick denial and an uphill appeals process.
Preventive Measures That Actually Work in Colorado's Climate
Attic ventilation reduces freeze-thaw damage by keeping the roof deck cold, which prevents snow from melting on the upper roof and refreezing at the eaves. Ridge vents combined with soffit vents create continuous airflow that equalizes attic temperature with outside air.
Homeowners often block soffit vents with insulation during energy upgrades, which traps heat in the attic and accelerates freeze-thaw cycles.
Proper insulation depth matters, too. Colorado's climate zones require R-38 to R-49 attic insulation depending on elevation. Under-insulated attics leak heat, melt snow unevenly, and create freeze-thaw hotspots. Over-insulated attics without adequate ventilation trap moisture, which condenses on cold roof decking and freezes overnight.
A different problem, but equally destructive.
Pro Tip: If you need heat cables to prevent ice dams, your attic insulation or ventilation is inadequate. Heat cables are a temporary band-aid that increases electric bills significantly. Fix the root cause—air-seal attic bypasses, add ventilation baffles, and upgrade insulation—before relying on heat cables as a permanent solution.
Gutter Maintenance and Heat Cables
Clogged gutters trap water that freezes solid and backs up under shingles. Cleaning gutters in October and March prevents ice buildup, but many Colorado homeowners also install gutter guards. The best guards allow water through while blocking pine needles and aspen leaves (common debris sources along the Front Range). Cheap mesh guards clog with granules washed off aging shingles, which defeats the purpose.
Heat cables prevent ice dams by keeping eave edges above freezing, but they're a band-aid, not a solution. If you need heat cables, your attic insulation or ventilation is inadequate. Heat cables also increase electric bills significantly during winter months.
Fix the insulation and ventilation first. Use cables only as a temporary measure while planning a proper attic energy retrofit.
Ice dam prevention services in Colorado often include both immediate remediation (removing existing ice) and long-term solutions (air-sealing attic bypasses, adding ventilation baffles, upgrading insulation). The immediate work stops active leaks, but without the long-term fixes, you'll get ice dams again next winter.
What to Do If You Suspect Freeze-Thaw Damage Right Now
Document everything with photos. Close-ups of lifted shingles, wide shots showing which roof planes are affected, pictures of interior water stains with a date stamp. If you're planning an insurance claim, this documentation establishes a timeline. If you're paying out of pocket, it helps contractors provide accurate estimates without multiple site visits.
Get at least three estimates from locally registered contractors. Ask each one to explain what they see, why it happened, and what they'd do differently during repairs to prevent recurrence.
A contractor who blames "cheap shingles" without mentioning ventilation, underlayment, or installation details probably doesn't understand freeze-thaw dynamics.
Check references specifically for freeze-thaw repairs. Hail damage and freeze-thaw damage require different skill sets. A crew that excels at insurance storm work may not understand the nuances of valley re-flashing or boot replacement in ways that prevent future freeze-thaw failures. Ask for references from jobs completed at least two winters ago. If those roofs are still leak-free, the contractor knows what they're doing.
For active leaks during winter, emergency roof repair services can apply temporary waterproof membranes and tarps that hold until spring when permanent repairs are feasible. Trying to install shingles or re-seal flashing in sub-freezing temperatures often creates worse problems—sealants don't bond, shingles crack during nailing, and you waste money on repairs that fail within weeks.
Temporary containment until temperatures stabilize is the smarter play.
Long-Term Roof Longevity in Freeze-Thaw Climates
Manufacturer warranties claim 25 to 50 years for asphalt shingles, but those estimates assume sea-level UV exposure and moderate freeze-thaw cycling. In Colorado, realistic lifespans run 15 to 20 years for standard architectural shingles and 20 to 25 years for Class 4 impact-resistant products.
Metal roofs and slate roofing last longer—40 to 60 years for metal, 75+ for slate—because they don't rely on organic materials that degrade under UV or sealants that fail in freeze-thaw cycles.
The key to maximizing lifespan is addressing small failures immediately. A $300 flashing repair in year five prevents a $2,000 decking replacement in year eight. Homeowners who follow a roof maintenance checklist—spring and fall inspections, prompt repairs, gutter cleaning, attic ventilation checks—consistently get 20% to 30% more life from their roofs than those who ignore maintenance until leaks appear.
Plan replacement timing strategically. If your roof is 18 years old and showing moderate freeze-thaw damage, replacing it in spring avoids the 6+ month contractor backlog that follows major summer hail events. Waiting until after a hailstorm means competing with hundreds of other homeowners for contractor availability, and quality crews book out for a year or more.
Proactive replacement on your timeline, not the insurance company's timeline, gives you better contractor choice and faster completion.
Frequently Asked Questions
Estimate your insurance payout and find out if filing makes sense.